
안녕하세요 ~ iOS 개발자 루크입니다~
오늘은 스토리보드 없이 코딩하기 5탄 탭바 컨트롤러 편입니다!
스토리보드 없이 탭바 컨트롤러 삽입하는 방법 시작합니다!
탭바 컨트롤러 클래스 생성
class MainTabController: UITabBarController {
// MARK: - Properities
// MARK: - lifeCycles
override func viewDidLoad() {
super.viewDidLoad()
}
// MARK: - Helpers
}
Swift
복사
RootViewController 설정 해주기
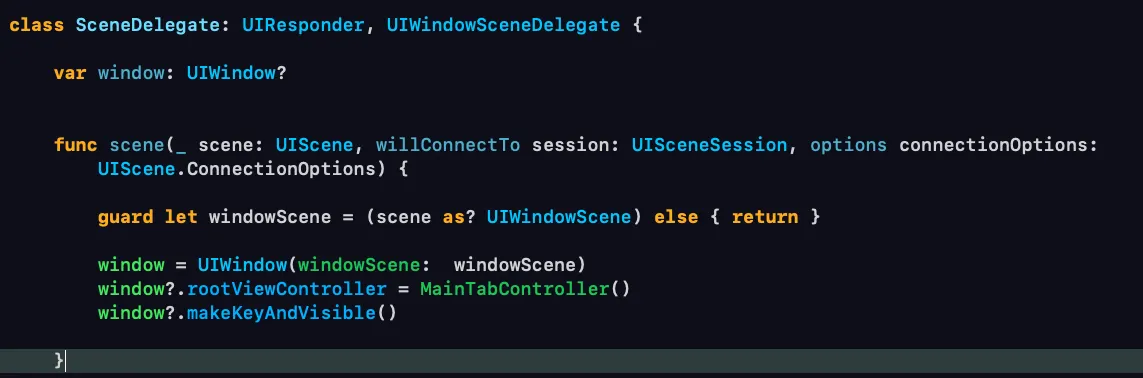
첫 뷰컨을 MainTabController 로 변경해주세요!
위 코드가 이해가 안간다면
위 링크를 참고해주세요 ㅎㅎ
탭바 아이템 추가해주기
다음은 탭바에 각각 뷰 컨트롤러를 연결해주는 단계입니다.
방법은 간단합니다.
뷰컨트롤러 객체를 생성해서,
let feed = FeedController()
Swift
복사
탭바 아이템의 이미지를 넣어주고
feed.tabBarItem.image = UIImage(named: "home_unselected")
Swift
복사
UITabBarController 클래스의 viewControllers 프로퍼티에 넣어주면됩니다
viewControllers = [feed]
Swift
복사
여러개의 뷰컨트롤러를 추가해주는 코드를
하나의 함수로 묶어서 아래와 같이 정의 해준 뒤,
func configureViewControllers() {
let feed = FeedController()
feed.tabBarItem.image = UIImage(named: "home_unselected")
let explore = ExploreController()
explore.tabBarItem.image = UIImage(named: "search_unselected")
let notification = NotificationController()
notification.tabBarItem.image = UIImage(named: "search_unselected")
let conversation = ConversationController()
conversation.tabBarItem.image = UIImage(named: "search_unselected")
viewControllers = [feed, explore, notification, conversation]
}
Swift
복사
viewDidLoad 에서 호출해주면 된답니다!

제대로 등장하는 것을 확인할 수 있습니다!
정리
class MainTabController: UITabBarController {
// MARK: - Properities
// MARK: - lifeCycles
override func viewDidLoad() {
super.viewDidLoad()
configureViewControllers()
}
// MARK: - Helpers
func configureViewControllers() {
let feed = FeedController()
feed.tabBarItem.image = UIImage(named: "home_unselected")
let explore = ExploreController()
explore.tabBarItem.image = UIImage(named: "search_unselected")
let notification = NotificationController()
notification.tabBarItem.image = UIImage(named: "search_unselected")
let conversation = ConversationController()
conversation.tabBarItem.image = UIImage(named: "search_unselected")
viewControllers = [feed, explore, notification, conversation]
}
}
Swift
복사
추가
최근 업데이트에서 탭바 컨트롤러의 기본 외관설정에 관해서 변경된 사항이 존재하는 것 같습니다.
원래라면 탭바는 약간 투명하고, 구분선이 존재해야하지만 위 에서 그렇지 않은 것을 볼 수 있습니다.
원래의 외관대로 다시 구현을 해주려면 아래의 코드를 헬퍼 함수로 추가해서 viewDidLoad 에서 호출해주시면됩니다.
func uiTabBarSetting() {
if #available(iOS 15.0, *){
let appearance = UITabBarAppearance()
appearance.configureWithOpaqueBackground()
appearance.backgroundColor = .white
tabBar.standardAppearance = appearance
tabBar.scrollEdgeAppearance = appearance
}
}
Swift
복사